Wednesday, August 30, 2017

Belated Bridal Shower cake post

Hello all!
This is very belated post on the cake I made for my friend's bridal shower! (Her bridal shower was in April ...oops!) Better late than never :)
This was my first time trying a naked layer cake and I'm pretty happy with how it turned out! The cake was nice and moist and not too sweet! It wasn't too difficult or time consuming either! So give it a go :D

Red Velvet Layer Cake with Chocolate Frosting
Recipe adapted from Sweetest Menu

Ingredients

Red Velvet Cake

350g (2 1/2 cups) plain flour
1 tsp baking powder
20g (1/4 cup) cocoa powder
300g (1 1/2 cups) caster sugar
230g unsalted butter
4 large eggs, room temperature
2 tsp vanilla essence
240ml (1 cup) greek yoghurt
2 tsp white vinegar
4 tsp red food colouring
60ml (1/4 cup) milk

1. Preheat oven to 180oC. Grease and line two 8 inch round cake tins.
2. In a large mixing bowl, sift the flour, baking powder and cocoa powder. Add sugar and whisk.
3. Melt the butter in the microwave.
4. In a separate mixing bowl, add eggs, vanilla and butter and whisk together until smooth. Add the greek yoghurt and stir.
5. In a small bowl mix together the red food colouring and vinegar.
6. Add the wet mixture into the dry mixture along with the food colouring and start to gently fold. Add milk and stir until just combined.
7. Pour the batter into the prepared cake tins and bake for 30 minutes or until a skewer inserted comes out clean. Place cakes on wire rack to cool.

Chocolate Frosting

230g unsalted butter, softened at room temp
150g (1 cup) dark chocolate
625g (5 cups) icing sugar
60ml (1/4 cup) milk

8. Place butter in large mixing bowl and beat with electric mixer until pale and creamy.
9. Melt the chocolate in a microwave and set aside to cool.
10. Once butter is pale and creamy, add one cup of icing sugar and one tablespoon of milk and beat on low until icing sugar is incorporated. Add the rest of the icing sugar, one cup at a time, and the milk, one tablespoon at a time, until thick and creamy.
11. Add melted and cooled chocolate to the buttercream until chocolate is completely mixed through. 
12. Level the cakes using serrated knife and set the leftover cake aside for decoration.
13. Place one of the cakes onto a turntable then gently frost the top. Add second cake layer on top and frost the sides and top of the cake. Scrape the buttercream from the side of the cake to get the "naked" cake look. Place cake in the fridge while you make the ganache. Set aside the remainder buttercream for decoration.

Chocolate ganache

150g (1 cup) dark chocolate melts
180ml (3/4 cup) thickened cream
Chocolate malt balls to decorate

14. Place chocolate melts in a heatproof bowl. In a small saucepan, add cream and heat on medium heat until just before cream boils. Immediately pour cream over chocolate, cover the bowl with a plate and leave for 3-5 minutes. Whisk mixture until smooth and creamy. Place in fridge for 5-10 minutes to thicken.
15. To decorate cake, gently pour chocolate ganache over the top and gently push drips over the sides of the cake. Leave to set. Before serving, pipe buttercream to the top of the cake. Add chocolate malt balls and sprinkle remaining cake crumb.

Nice even layers yay!
Hope I can continue blogging regularly ^^" till next post~~

Tuesday, May 16, 2017

Bridal shower cupcakes

I made these cupcakes for a friend's bridal shower! I also made the cake which I will show you in another post ^^ This recipe is great to make after you make the Chocolate lava cake (see previous post) because you will have 2 leftover egg whites which you can use for these cupcakes (partly why I chose this recipe).
Very Vanilla Cupcakes
Recipe adapted from Sally's Baking Addiction

Ingredients
210g plain flour
1/2 tsp baking powder
1/4 tsp bicarb soda
1/2 tsp salt
200g caster sugar
115g unsalted butter, melted and slightly cooled
2 large egg whites
60g greek yoghurt/plain yoghurt/sour cream
180ml milk
2 tsp vanilla essence
seeds scraped from 1/2 split vanilla bean (if you have)

Vanilla frosting

115g unsalted butter, softened to room temperature
240-300g soft icing sugar
60ml thickened cream
1 tsp vanilla essence
seeds scraped from 1/2 split vanilla bean (if you have)
pinch of salt

1. Preheat oven to 180oC. Line muffin tin with 12 cupcakes liners and set aside.
2. Mix together flour, baking powder, bicarb soda and salt in a medium bowl and set aside. Melt butter in a separate bowl. Whisk in the sugar. Whisk in egg whites, yoghurt, milk and vanilla essence until combined. Add scraped seeds from 1/2 split vanilla bean.
3. Slowly mix dry ingredients into wet ingredients until smooth. 
4. Divide batter among 12 cupcake liners and bake for 20 minutes or until a toothpick inserted in the center comes out clean.
5. For frosting, beat softened butter on medium speed using an electric or stand mixer. Beat until smooth and creamy (around 3 minutes). Add icing sugar, cream, vanilla essence, vanilla bean seeds with the mixer running. Increase to high speed and beat (around 3 minutes). Add more icing sugar if frosting is too thin or more cream if too thick. Add salt to taste. 
6. Transfer frosting to piping bag and frost cooled cupcakes. (I topped these with malt chocolate balls)


I brought a few cupcakes to the cafe to try and sell and I made my first sale :D The lady said they looked really pretty and tasted delicious *Confidence boost*! Too bad I am no longer working there... so can't sell anything else! Maybe I should set up a stall at a market...

Wednesday, April 26, 2017

Sally's Baking Challenge: Chocolate lava cakes (February)

Very belated post but a late post is better than no post right? ^^"

I decided to take part in Sally's Baking Challenge in February! Sally is another food blogger (you guys should check out her blog here! It's so colourful and delicious!) and she has started these baking challenges where she posts a recipe and challenges you to bake it. So I took on the CHALLENGE!

Chocolate Lava Cakes
Recipe adapted from Sally's Baking Addiction

Ingredients
170g dark chocolate melts
115g unsalted butter
30g plain flour
60g soft icing sugar
pinch of salt
2 large eggs
2 large egg yolks

1. Spray 4 holes of muffin pan or ramekins with nonstick cooking spray and dust with cocoa powder.
2. Preheat oven to 220oC.
3. Melt chocolate and butter in microwave on high in 10 second increments, stirring after each until completely smooth and set aside.
4. Whisk flour, icing sugar and salt together in a small bowl. Whisk eggs and egg yolks together into another small bowl. Pour the flour mixture and eggs into the bowl of chocolate. Slowly stir everything together.
5. Spoon chocolate batter evenly into prepared ramekin or muffin cup.
6. If using muffin pan - bake for 8-10 minutes. If using ramekins, place on baking sheet and bake for 12-14 minutes.
7. Allow to cool for 1 minute turn cakes upside down to serve. Serve immediately (I suggest icecream and fresh fruit ^^)
These were really really easy!! Great to make for friends because they will sure be impressed with the oozy centre!

Thursday, March 2, 2017

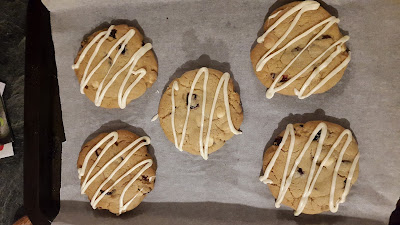
Cafe style cookies

I was asked to make some cookies to sell at the Cafe that I work at and I was SUPER EXCITED :D First time something I have baked was going to be sold in a cafe! I wanted to make a decent sized cookie that looked appetising and found this recipe!

White Chocolate and Cranberry Cookies
Recipe adapted from Allrecipes
Ingredients
1/2 cup (113g) unsalted butter, softened
1/2 cup packed brown sugar
1/2 cup caster sugar
1 egg
1 1/2 cups plain flour
1/2 tsp vanilla essence
1/2 tsp baking soda
3/4 cup white chocolate chips
1 cup dried cranberries
1/2 cup white chocolate melts

1. Preheat oven to 190oC. Line 2 baking trays with baking paper.
2. In a large bowl, cream together the butter and both sugars until smooth. Beat in the egg and vanilla essence. 
3. Combine the flour and baking soda. Stir into the butter-sugar mixture. Mix in chocolate chips and cranberries. 
4. Roll 1 tablespoon of dough into a ball and place on baking tray. Complete with the rest of the mixture making sure to leave room for the cookies to spread.
5. Bake for 8-10 minutes. Allow cookies to cool on baking tray before transferring to wire racks to cool completely.
6. Melt white chocolate melts in a small bowl in microwave. Transfer to a piping bag and pipe patterns on to the cookies.

I also made double chocolate chip cookies by replacing the cranberries with dark chocolate chips.

Sad news is.... Only one sold in the first week :( I think the market wasn't there... the cafe's main customers are office workers and I think they prefer muffins and cakes. But its ok! I got some experience and maybe next time I can bake other things :)

The cookies still tasted delicious so if you want cafe style cookies at home then try these =)

Tuesday, February 7, 2017

Matcha Love!

I love MATCHA!!! I have probably mentioned on my blog before but I'll say it again!! Matcha is awesome!! It has become quite a food trend over the last year or so (good for me! ^^) and I found an awesome recipe that is quick, easy and DELICIOUS! It's similar to the recipe I have previously tried (link here) but this recipe adds ground almonds which definitely adds to the texture. The original recipe also used white chocolate chips but I didn't have any and forgot to get some at the shops so just used dark chocolate chips~ still tasted nice though.

The dough can be made hours, days or weeks (up to 8 weeks) in advance then taken out of the freezer to slice and bake whenever you have that cookie craving (everyday for me! ><)


Matcha Chocolate Chip Cookies
Recipe adapted from The MeatMen

Ingredients
180g unsalted butter (room temperature)
140g icing sugar
1/4 tsp salt
2 egg yolks
40g ground almonds/almond meal
240g plain flour
20g matcha powder
60g chocolate chips

1. Sift plain flour and matcha powder together and set aside.
2. In another bowl, cream together the butter and icing sugar using an electric beater until light and fluffy.
3. Add salt and egg yolks and mix until combined.
4. Mix in ground almonds until well combined.
5. Gradually add in the flour and matcha and mix well.
6. Stir in the chocolate chips. 
7. Divide the dough into 2 portions. Shape the dough into logs (4cm diameter), wrap with cling wrap and refrigerate for at least 2 hours.
8. Preheat oven to 165oC and line 2 baking trays with baking paper. Cut dough into 5mm thick slices and arrange on baking tray.
9. Bake for 10 minutes or until slightly golden. Rest on baking tray for 10 minutes before transferring to wire rack to cool. 
I'm loving my fish plate ^^

Try it out~ Happy baking!!!

Exciting news too! Just recently got a part time job at a little cafe/sandwich bar/catering company thank God!! First day of work is today!! One step closer to my baking dream :) 

Thursday, February 2, 2017

I AM BACK!!!

Hi all!!!
Baking Tray is BACK!!!! It's been a very very long time since my last post.. 2.5 years in fact! 
Many things have happened in the last 2.5 years... I think I got a lot busier and also stopped work catering so stopped the weekly blog post. I also got an instagram account so I used that to post my bakes ^^" It was easier to post a photo then blog about it =p (lazy...)

I have also recently got married and moved interstate!! So lots have been going on! But as I am currently unemployed I thought might as well revive the blog! I have still been baking a lot! Baked for my own wedding ^^" I've also found my own blog useful as a collection of recipes for whenever I feel like baking something.

So to begin a new year (2017... and yes I realised it's February so already a month into the year.. but hey! Chinese new year was just a few days ago :P) here is my FIRST POST!!! And hopefully many more to come in the future =)


I've begun a journey to bake the most perfect light and fluffy Japanese Cheesecake! I've yet to find the best recipe but this one is very easy with only 3 ingredients! Although it does not have the height that I would like, it still tastes delicious :)

Japanese Cheesecake
Recipe adapted from Epicurious

Ingredients
250g white chocolate melts
250g block of cream cheese (at room temperature), cubed.
6 eggs, separated (at room tempterature)

1. Preheat oven to 180oC. Grease and line 8 inch cake tin. 
2. Melt white chocolate in bowl over a double boiler.
3. Add cubes of cream cheese and melt.
4. Remove from heat and mix in 6 egg yolks.
5. In a separate bowl, beat egg whites with electric beater until stiff peaks form.
6. Add one third of egg whites into chocolate mix and gently fold in. Fold the remaining egg whites in 2 additions until just combined.
7. Pour mix into prepared cake tin. Place pan in a baking dish/roasting pan and add warm water to reach halfway up the side of the cake tin. Bake until cheesecake is set (around 40-45 minutes). 
8. Turn off the oven and leave tin in oven for 15 minutes then transfer to wire rack to cool completely. Remove cheesecake from tin and transfer to a platter. Refrigerate for at least 4 hours before serving. 

Things to improve: Mine did not turn out so light and fluffy. It may have been due to not beating egg whites enough and also the size of the pan. I will try again!!